Learning how to draw the human figure properly is one of the core skills you should have if you are serious at pursuing art. Knowing how proportions and ratios are done will help you come up with drawings, cartoons and illustrations that are as life-like as it can be.
And the best part? Mastering the human figure in its correct proportions is easy through constant practice and exercise. In this article, we will walk you through the basic human figure starting from the head down to the feet. Ready? Ready!
And the best part? Mastering the human figure in its correct proportions is easy through constant practice and exercise. In this article, we will walk you through the basic human figure starting from the head down to the feet. Ready? Ready!

Start charting with heads
Remember: Body proportions are always defined by the alignment of the joints. This alignment of joints is constant and will always form the groundwork of your proportions.
Start by creating circles (oval and egg shapes are fine to use) for a head and from there, mark down eight measurements with the last one being on the ground.
Start by creating circles (oval and egg shapes are fine to use) for a head and from there, mark down eight measurements with the last one being on the ground.
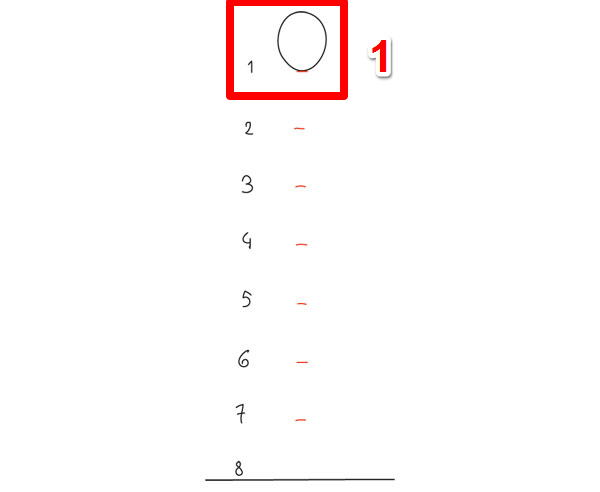
Photo source: www.design.tutsplus.com
Why eight heads you might ask?
It all stems back during the Renaissance period when it was established that the measurement for the ideal height is equal to eight heads.
It all stems back during the Renaissance period when it was established that the measurement for the ideal height is equal to eight heads.
From the head, create the pelvis
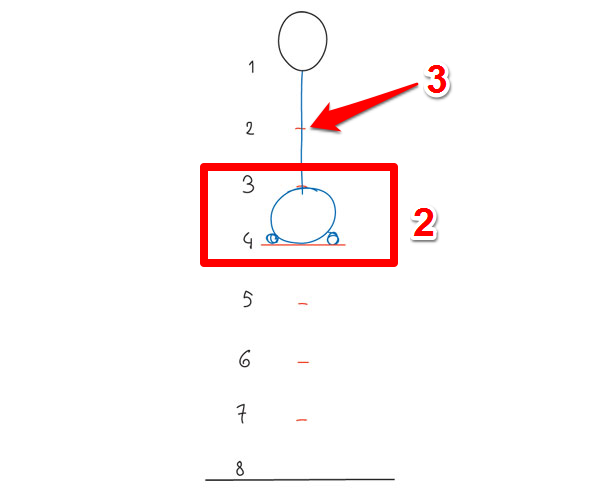
Between marks 3 and 4, create the body's pelvic bone by drawing a circle. Add two hip joints (small round circles) just below it. Make sure the width is anywhere between 1.5 to 2 head-widths.
After drawing the pelvic bone and the hip joints, draw a line connecting it to the head. This line will serve as your body's spine.
After drawing the pelvic bone and the hip joints, draw a line connecting it to the head. This line will serve as your body's spine.
Next up, the legs and the knees
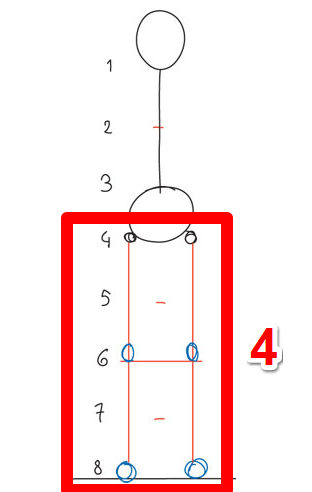
When drawing the human figure, it is always assumed that the figure is standing up straight with knees and feet aligned with the hip joints.
Having that in mind, draw the knee joints on mark 6 and draw a line below it. This line will correspond to the bottom of the knee caps.
On mark 8, draw two circles for the feet.
Complete the legs by connecting the hip joints and the knee joints with a straight line. Connect the knee joints with the feet also with a straight line.
Add volume with the ribcage and belly button
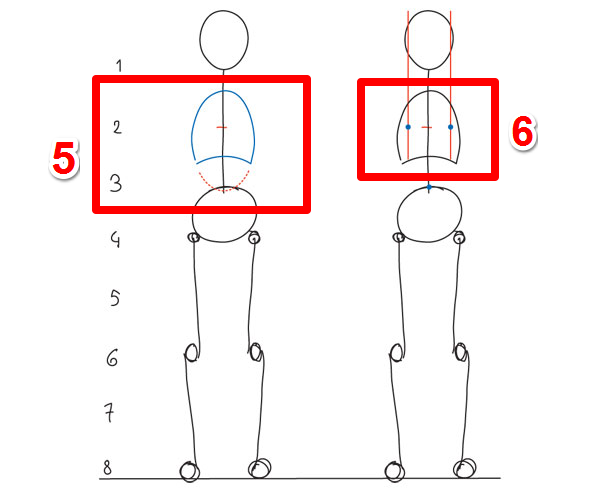
Next to the head and the pelvis, the addition of the rib cage adds further volume to your human figure.
Draw an oval between marks 1 and 2 and down to mark 3. As a suggestion, remove the lower part of the oval so it shows what an actual rib cage looks like.
Add more details to the rib cage by drawing nipples on mark 2 (just inside the head) and a belly button on mark 3.
Draw an oval between marks 1 and 2 and down to mark 3. As a suggestion, remove the lower part of the oval so it shows what an actual rib cage looks like.
Add more details to the rib cage by drawing nipples on mark 2 (just inside the head) and a belly button on mark 3.
Make it more realistic with shoulders
Draw your shoulder line halfway between marks 1 and 2. The shoulder line does not necessarily have to be a straight line. In fact, drawing it slightly curved down makes it look more realistic. Shoulders, in real life, should not be so tensed and stiff after all.
Shoulder muscles (also called the trapezius muscles) can take on many forms as seen in the image below. This depends on the muscular composition of the person you are drawing.
Shoulder muscles (also called the trapezius muscles) can take on many forms as seen in the image below. This depends on the muscular composition of the person you are drawing.
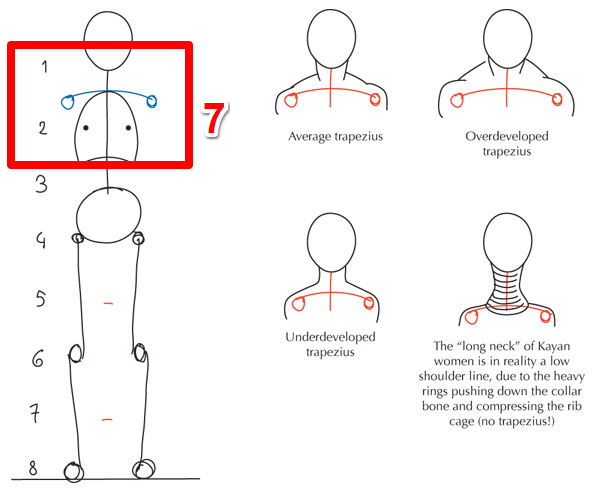
If you are drawing a human figure carrying too much muscle or fat, you can have the shoulder line up high, making the illusion of a large chest and a short neck. Conversely, if you are drawing a human figure of a young person whose trapezius muscles are slightly underdeveloped, you can draw the shoulder line down to create an illusion of a longer neck.
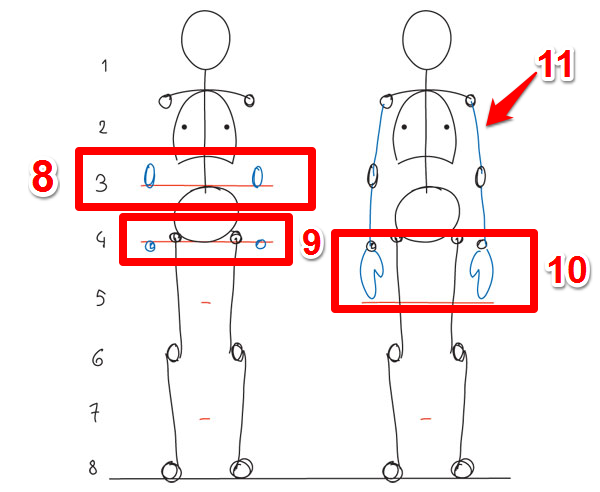
Finally, add the hands, wrists and arms
For the final touches, add the elbows on mark 3 and the wrists on mark 4. The wrists should be slightly higher above the hip joints.
Hands are also roughly between the thighs so draw them on mark 5. Connect these circles with a straight line to create your arms.
Hands are also roughly between the thighs so draw them on mark 5. Connect these circles with a straight line to create your arms.
And now it's your turn!
Now that you know the steps of making your own human figure, you're ready to make one on your own! We found you a tutorial you can watch too as an additional learning material.
We can help you harness your human figures and apply it to your art here at Art Smart! Our art classes always follow a 2:1 ratio - meaning 2 students per 1 Art Smart teacher. Let our teachers guide you as you learn and improve your human body proportions on paper!
Enroll in our class and secure your slot now by calling us at 0915-5948191, 0917-8784766 or (02)7886766!
Enroll in our class and secure your slot now by calling us at 0915-5948191, 0917-8784766 or (02)7886766!
 RSS Feed
