Probably one of the best ways to make your art, sketches and even the doodles at the book of your notebook look super realistic is to learn how to shade.
Shading is a technique used to represent light and shadows by varying the color and the intensity of the medium being used. The medium often used in shading are pencils.
By learning how to add depth, character and movement to your drawings, you can slowly breathe life into your art! And in this article, we will show you the seven basic aspects of shading so you can get started on the right foot.
Use a fine set of pencils
Even if you are just beginning to learn how to shade, choosing the right supplies is very imperative.
To achieve the right shadows for your drawings, make sure you are using a graphite pencil. Graphite pencils are inexpensive and are widely available in art supply stores and bookstores.
Aside from a graphite pencil, make sure to find yourself some sturdy drawing papers with fine grain as well. This type of paper will absorb the shading that you will be doing. Printer papers are too smooth and construction papers are too rough for shading.

Photo source: www.strathmoreartist.com
And as you progress and make stellar improvements in your shading, you can advance to artist pencils that come in a range of softness and hardness. HB graphite pencils come in different ratings where H refers to hard graphite and B refers to soft graphite. These are typically available in different ratings like 2B, 4B, 6B and 8B (the softest) and 2H, 4H, 6H nd 8H (the hardest).
If you want to achieve the best shading for your drawings, always use the softest graphite pencil or 2H.
If you want to achieve the best shading for your drawings, always use the softest graphite pencil or 2H.
Start with line drawings of your subjects
For this basic aspect of shading, start by drawing any real life object that you see - a spoon, a glass, a chair, basically anything! Another option is to take a photo of any subject and print a physical copy of it.
The objective of this step is for you to learn how to create line drawings in the negative spaces. For instance, if you have a drawing of a chair, then the negative spaces would be the spaces in between the legs of the chair or the space at the back of the back rest.
The objective of this step is for you to learn how to create line drawings in the negative spaces. For instance, if you have a drawing of a chair, then the negative spaces would be the spaces in between the legs of the chair or the space at the back of the back rest.
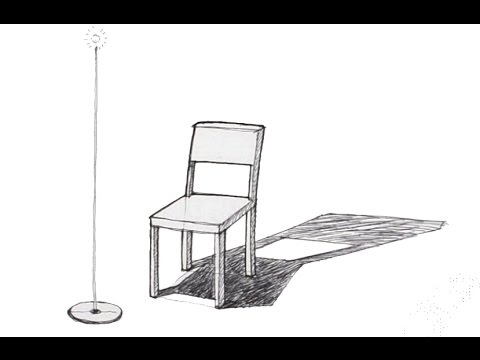
Photo source: https://www.youtube.com/watch?v=J9J31u751YM
Create your own value scales
What is a value scale?
A value scale is the lightness and darkness of your shades, which guide you in adding depth to your drawings. A typical value scale starts from a complete white with different shades of gray in between.
As a starting point, try to have at least 5 adjacent values in your value scale. You can check out the video below on how it is done!
Choose where your light source is
All of the shadings you will do will always be relative to your light source. Simply put, the closer you are to your light source, the brighter or lighter your shaded area will be. And the farther you are away from your light source, the darker your shaded area will become.
It is imperative to always locate your light source. Everything else will be relative from there. Think of it simply like in the illustration below:
It is imperative to always locate your light source. Everything else will be relative from there. Think of it simply like in the illustration below:
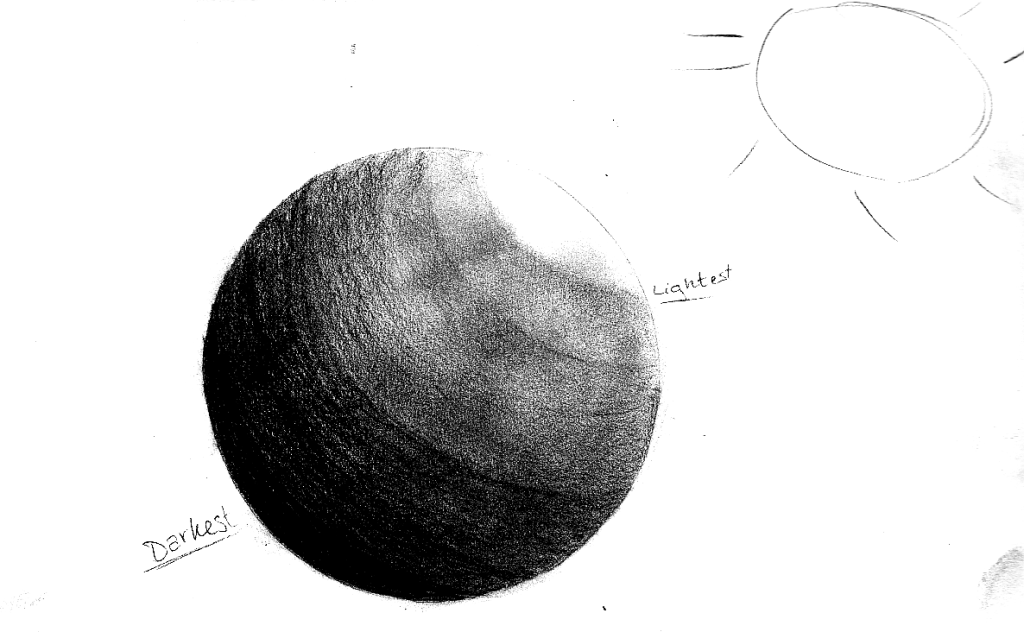
Photo source: www.gaiaonline.com
Decide on what your shading method will be
There are several shading methods you can choose depending on your subject, where your light source is and the kind of texture you are aiming for. In this section, we'll cover three common shading methods you can give a try:
First is hatching or the process of creating many parallel lines close together to create a shade. Hatching is ideal for objects that are lacking texture or have natural grain like hair.
First is hatching or the process of creating many parallel lines close together to create a shade. Hatching is ideal for objects that are lacking texture or have natural grain like hair.
Second is cross hatching. If hatching is creating a series of parallel lines close to one another, cross hatching is where you draw crossing lines, forming many little X's on your drawing. If you want to add shadows quickly and easily while adding texture, cross hatching is your best bet.
And then third, circular shading. This is done by creating small overlapping circles. If you want to add a lot of texture, space your circles far apart while using heavy lines. If you want to create a smooth blend, keep the circles tight and close to each other.
Create your shadows gradually
It goes without saying that for you to achieve the best shading for your drawing, you have to start creating preliminary shading of your drawing first before adding more and more layers of shadows.
Do not use the full darkness of your pencil when starting out because it will be hard to erase them just so you can adjust your the intensity of your shadows relative to your light source. Press lightly at the start and only barely fill in areas that require shadows.
As you progress into your shading, always reference your value scale so your drawing is well-balanced. Take your time and simply enjoy the process!
Always have complete control of your medium
Even as you graduate from graphite pencils, never lose control of your chosen medium when shading. Gain control through constant practice and pretty soon, you will be a master of creating shadings for your drawings.
Control of your medium is also based on how you clearly understand how light behaves and how you can communicate this clearly on your drawing.
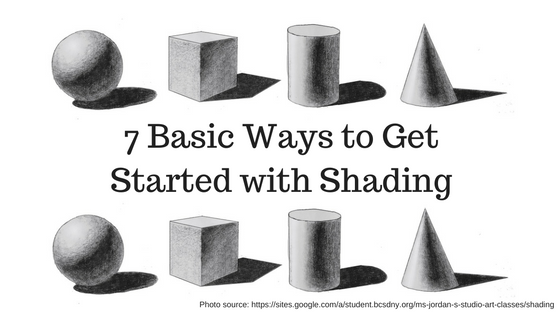
Start with basic shapes. Shade to communicate one light source using a full range of values and then move up to irregular forms and simple still-life objects like fruits and hands.
Control of your medium is also based on how you clearly understand how light behaves and how you can communicate this clearly on your drawing.
Start with basic shapes. Shade to communicate one light source using a full range of values and then move up to irregular forms and simple still-life objects like fruits and hands.
Your turn!
If you are keen on learning how to shade or simply want to enhance your shading skills, come and join us for an art class here at Art Smart! Aside from shading, learn how to paint, do mosaics, use oil pastels and so much more! Art Smart is open for kids at least 4.5 years old and adults. Our rates and schedules are available over here and below is our schedule for your reference.

For questions or clarifications, drop us a line at 0915-5948191, 0917-8784766 or (02)7886766. See you all very soon in our studios!
 RSS Feed
